Let us create a winged figure in Photoshop. For this you need to have the 'wings' and a free stock image. Both are easily available.
You can download the 'wing' brush here. If you do not know how to install a Brush in Photoshop please see here.
Download this free stock photo from here.
Step 1 : Open the image in Photoshop.
Step 2 : Click the New Layer icon in the Layers palette and a new Layer 1 forms.
Step 3 : Click the Brush Tool.
Step 4 : In the top panel click the Brush icon at right to bring up the Brushes palette. Then click on where the red arrow points.
Step 5 : This brings up the Brushes available in Photoshop. I have installed a lot of free Brushes. You should have installed the 'wings' Brush by now.
Step 6 : I have located the wings Brush. click on it.
Step 7 : You will find this dialogue box appear. Click OK.
Step 8 : The wings brushes are visible at the top of the dialogue box.
Step 9 : I am clicking on Brush No 608. Click on the 'Brush Tip shape at the left.
Step 10 : Click on the Brush Tip shape. Drag the Spacing slider at the bottom till the 'wings' separate as shown.
Step 11 : Click on the arrow to close the Brush palette.
Step 12 : Use the ] (right bracket key next to the letter P on your keyboard) to increase the Brush Tip size. I have increased the Brush.
Step 13 : I have clicked once with the Brush tip. The wings appear Black. Press CTRL+Z to undo it.
Step 14 : This is because the Foreground Color is set to Black.
Step 15 : Click the Eyedropper Tool.
Step 16 : With the Eye Dropper Tool selected I have clicked on a dark shade of her hair.
Step 17 : The Foreground Color immediately changes to the Color picked.
Step 18 : Click on the Brush Tool again.
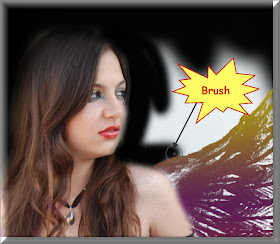
Step 19 : Click once with the Brush.
Step 20 : I have clicked once with the Brush. It, however, is not much of an improvement. Let us try something else.
Step 21 : CTRL+CLICK the layer thumbnail on Layer 1.
Step 22 : As soon as click you will find a small selection of marching ants on the wings.
Step 23 : Click on the Gradient Tool and then at the top where the arrow points to bring up the Gradient Editor.
Step 24 : The Gradient Editor appears. Click on the Gradient the small white hand points. You will find it in your version. I have a lot of extra Gradients. Do not bother about it.
Step 25 : With the Gradient Tool selected drag straight down to just cover the wing.
This is how the wing looks like. Press CTRL+D to deselect.
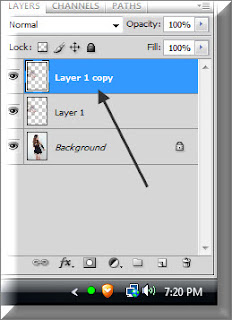
Step 26 : Press CTRL+J. Layer 1 duplicates to Layer 1 copy.
The wing looks more prominent now.Step 27 : Press SHIFT and click on Layer1. Both layers are highlighted.
Step 28 : Press CTRL+E. Both the Layers merge into Layer 1 copy.
Step 29 : Press CTRL+J again. Layer 1 copy duplicates into Layer 1 copy 2.
Step 30 : Press CTRL+T. Right click. From the menu that pops up click on Flip Vertical.
Step 31 : Click on the Move Tool.
Step 32 : Press SHIFT and use the Move Tool to move the second wing to the right. Press ENTER.
Step 33 : Press SHIFT and click on layer 1 copy. Both Layer 1 copy 2 and Layer 1 copy are highlighted.
Step 34 : Press CTRL+E. Both the layer merge into Layer 1 copy 2.
Step 35 : Click the Add Layer Mask button on the Layers palette and a Layer Mask forms next to the layer thumbnail on Layer 1 copy 2.
Step 36 : Click the Brush Tool.
Step 37 : Click the Brush icon in the top panel (red arrow). Then where the black arrow points to.
Step 38 : The Brushes palette opens again. Click on the 'Reset Brushes'. You will find it on the left.
This is how the Brushes panel looks after resetting the Brushes.
Step 39 : In the left panel at the top click where the arrow points to bring up the Brushes palette. Set the Master Diameter by dragging the slider to the left. This increases the size of the Brush tip. Set the Hardness to 0.
Step 40 : Ensure that the Foreground is set to Black. If not, press 'D' on your keyboard.
Step 41 : Use the Brush to wipe away the wings from the body. If you go wrong change the Foreground Color to white and paint away the mistake. Change the Foreground Color to Black and resume painting again.
Step 42 : The wings have been erazed from her body.
Step 43 : Press CTRL+J thrice. Layer 1 copy 2 triplicates into Layer 1 copy 5.
Step 44 : Press SHIFT and click on Layer 1 copy 2. All the layers are highlighted.
Step 45 : Press CTRL+E. All the Layers merge into Layer 1 copy 5.
This is how the image looks with the wings.
Step 46 : Press CTRL and click on the New Layer icon. A new layer 1 form under Layer 1 copy 5.
Step 47 : Make sure that the Foreground Color is set to Black.
Step 48 : Click on the Brush Tool. Step a large diameter as shown in Step 39.
Step 49 : Begin painting with the Black. To increase the size of the Brush press ] (right bracket) and to make it small [ (left bracket). You will need to constantly change the Brush tip from large to small as you paint. Remember these shortcuts.
Step 50 : Paint carefully around the fingers.
The finished image.
Other photoshop tutorials are here.


Post a Comment
Post a Comment