You must have seen those images of models with a highlight in the Background. It's done with lights. You can also replicate it in Photoshop to some extent. We will create a poster too.
This is what we will create.
Step 1 : Let's begin with this free stock image. You will find it here
It belongs to mjranum-stock
Step 2 : Click the Quick Selection Tool..
Step 3 : Add to selection should be selected in the top panel.
Step 4 : Drag with the Quick Selection Tool to quickly select the Background.
Step 5 : Select the entire background including below the left arm and the bits of background visible behind her right hand.
Step 6 : Press CTRL+SHIFT+I to inverse the selection.
Step 7 : Go to Select>Modify>Feather.
Step 8 : The Feather Selection dialogue box comes up. I have set a Feather Radius of 3 pixels. Click OK.
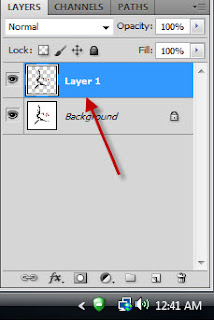
Step 9 : Press CTRL+J. The selection is copied and pasted onto a new Layer 1. Click off the eye icon in the Background Layer.
Step 10 : Press CTRL+CLICK on New Layer icon. A new Layer 2 forms under Layer 2.
Step 11 : The Foreground/Background Colors should be set to the default Black/White. If it is not press x and d on the keyboard to restore the default.
Step 12 : Press CTRL+BACKSPACE to fill with Background Color which is White in this case.
The image looks like this.
Step 13 : Zoom out.
Step 14 : Click the Crop Tool.
Step 15 : Drag out with the Crop Tool
Step 16 : With the left mouse button pressed drag out to the right.
Step 17 : Click the Tick mark in the top panel.
The image looks like this.
Step 18 : Press CTRL+T. A selection forms.
Step 19 : Drag out the middle handle to the right. Press ENTER or click the tick mark in the top panel.
Step 20 : Use the Crop Tool again to drag out the middle handles at top, left and bottom. Press ENTER.
Step 21 : The image looks like this. Press CTRL+T.
Step 22 : Drag the middle handle at left and bottom out to cover the transparent portions. Press ENTER.
The image looks like this.
Step 23 : Click the Foreground Color. The Color Picker opens. Click a shade of light blue. If you want to use the same shade type in 92e8f5 at the box in the bottom. Click OK.
The Foreground Color changes to the color picked.
Step 24 : Press x on the keyboard to switch the Foreground/Background colors.
Step 25 : Click the Gradient Tool.
Step 26 : Click the tiny arrow to reveal the Gradients. I have clicked the Foreground to Background Preset.
Step 27 : Click on the Radial Gradient.
Step 28 : Drag with the Gradient Tool diagonally as shown.
The image looks like this.
Step 29 : Again use the Crop Tool. Drag out the top, left and bottom handle. Press ENTER.
Step 30 : The image looks like this. Press CTRL+T. A selection forms.
Step 31 : Drag out the middle handles. Press Enter.
The image looks like this.
Step 32 : The Background is too large. Crop it out.
This is how the image looks after cropping.
Step 33 : Click on Layer 1.
Step 34 : Click on the Layer Styles button. Click on Drop Shadow.
Step 35 : The Drop Shadow dialogue opens. Just click OK without altering the settings.
Step 36 : Right click the Drop Shadow. Click on Create Layer.
Step 37 : This dialogue box opens. Click OK.
Step 38 : Layer 1's Drop Shadow forms below Layer 1. Click on it.
Step 39 : Press CTRL+T. A selection forms..
Step 40 : Keeping CTRL+T pressed drag the middle top handle sideways and down.
Step 41 : Move the Drop Shadow down.
Press ENTER.
Step 42 : Lower the Opacity of the Layer to 50%.
Step 43 : Click the rectangular Marquee Tool.
Step 44 : Drag out a selection with the shadow inside.
Step 45 : Click the Layer mask button. A Layer Mask forms on Layer1's Drop Shadow.
Step 46 : Press s and then d on the keyboard. Then press x again. This makes the Foreground/Background White/Black.
Step 47 : Click the Gradient Tool.
Step 48 : Drag with the Gradient Tool from below to near the feet.
The image looks like this.
Download this logo. You will find it here.
Step 49 : Click the Magic Wand.
Step 50 : Click on the White Background with the Magic Wand. A selection of marching ants appear. Press CTRL+SHIFT+I to invert the selection.
Step 51 : Click on Subtract from selection.
Step 52 : Click inside the D which has not been selected with the Magic Wand. The inside of the D is also selected. Do likewise on the letters A and R.

Step 53 : Press CTRL+J. The selection is pasted onto Layer1.
Step 54 : Press v (move Tool). Drag the logo onto the composition. Press CTRL+D to deselect.
Step 55 : Click the Erazer Tool.
Step 56 : Eraze the year.
The finished image with the highlighted background.
Other photoshop tutorials are here
This is what we will create.
Step 1 : Let's begin with this free stock image. You will find it here
It belongs to mjranum-stock
Step 2 : Click the Quick Selection Tool..
Step 3 : Add to selection should be selected in the top panel.
Step 4 : Drag with the Quick Selection Tool to quickly select the Background.
Step 5 : Select the entire background including below the left arm and the bits of background visible behind her right hand.
Step 6 : Press CTRL+SHIFT+I to inverse the selection.
Step 7 : Go to Select>Modify>Feather.
Step 8 : The Feather Selection dialogue box comes up. I have set a Feather Radius of 3 pixels. Click OK.
Step 9 : Press CTRL+J. The selection is copied and pasted onto a new Layer 1. Click off the eye icon in the Background Layer.
Step 10 : Press CTRL+CLICK on New Layer icon. A new Layer 2 forms under Layer 2.
Step 11 : The Foreground/Background Colors should be set to the default Black/White. If it is not press x and d on the keyboard to restore the default.
Step 12 : Press CTRL+BACKSPACE to fill with Background Color which is White in this case.
The image looks like this.
Step 13 : Zoom out.
Step 14 : Click the Crop Tool.
Step 15 : Drag out with the Crop Tool
Step 16 : With the left mouse button pressed drag out to the right.
Step 17 : Click the Tick mark in the top panel.
The image looks like this.
Step 18 : Press CTRL+T. A selection forms.
Step 19 : Drag out the middle handle to the right. Press ENTER or click the tick mark in the top panel.
Step 20 : Use the Crop Tool again to drag out the middle handles at top, left and bottom. Press ENTER.
Step 21 : The image looks like this. Press CTRL+T.
Step 22 : Drag the middle handle at left and bottom out to cover the transparent portions. Press ENTER.
The image looks like this.
Step 23 : Click the Foreground Color. The Color Picker opens. Click a shade of light blue. If you want to use the same shade type in 92e8f5 at the box in the bottom. Click OK.
The Foreground Color changes to the color picked.
Step 24 : Press x on the keyboard to switch the Foreground/Background colors.
Step 25 : Click the Gradient Tool.
Step 26 : Click the tiny arrow to reveal the Gradients. I have clicked the Foreground to Background Preset.
Step 27 : Click on the Radial Gradient.
Step 28 : Drag with the Gradient Tool diagonally as shown.
The image looks like this.
Step 29 : Again use the Crop Tool. Drag out the top, left and bottom handle. Press ENTER.
Step 30 : The image looks like this. Press CTRL+T. A selection forms.
Step 31 : Drag out the middle handles. Press Enter.
The image looks like this.
Step 32 : The Background is too large. Crop it out.
This is how the image looks after cropping.
Step 33 : Click on Layer 1.
Step 34 : Click on the Layer Styles button. Click on Drop Shadow.
Step 35 : The Drop Shadow dialogue opens. Just click OK without altering the settings.
Step 36 : Right click the Drop Shadow. Click on Create Layer.
Step 37 : This dialogue box opens. Click OK.
Step 38 : Layer 1's Drop Shadow forms below Layer 1. Click on it.
Step 39 : Press CTRL+T. A selection forms..
Step 40 : Keeping CTRL+T pressed drag the middle top handle sideways and down.
Step 41 : Move the Drop Shadow down.
Press ENTER.
Step 42 : Lower the Opacity of the Layer to 50%.
Step 43 : Click the rectangular Marquee Tool.
Step 44 : Drag out a selection with the shadow inside.
Step 45 : Click the Layer mask button. A Layer Mask forms on Layer1's Drop Shadow.
Step 46 : Press s and then d on the keyboard. Then press x again. This makes the Foreground/Background White/Black.
Step 47 : Click the Gradient Tool.
Step 48 : Drag with the Gradient Tool from below to near the feet.
The image looks like this.
Download this logo. You will find it here.
Step 49 : Click the Magic Wand.
Step 50 : Click on the White Background with the Magic Wand. A selection of marching ants appear. Press CTRL+SHIFT+I to invert the selection.
Step 51 : Click on Subtract from selection.
Step 52 : Click inside the D which has not been selected with the Magic Wand. The inside of the D is also selected. Do likewise on the letters A and R.

Step 53 : Press CTRL+J. The selection is pasted onto Layer1.
Step 54 : Press v (move Tool). Drag the logo onto the composition. Press CTRL+D to deselect.
Step 55 : Click the Erazer Tool.
Step 56 : Eraze the year.
The finished image with the highlighted background.
Other photoshop tutorials are here


Post a Comment
Post a Comment