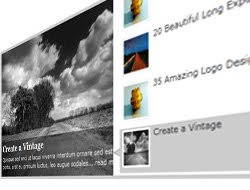
Today, we'll learn how to add it into Blogpsot Blogs. Earlier, I created Platinum Blogger Template. From the most of the template users, I received the comments that Featured Post widget is not present there. So considering this, I am writing the separate tutorial which we will start now!
First of all view the Demo here.
Note: Platinum Blogger Template users don't have to follow the Step1, Step2, Step3, Step4 and Step5. So you can directly jump to Step 6.
Updated: All code has been updated. Please re follow the instructions those who have installed this widget.
Step 1. As general, Log on to your Blogger account and go to Design > Edit HTML.
Step 2. Find the following code in your Template:
]]></b:skin>Step 3. Just above ]]></b:skin> tag, add the following CSS codes:
Step 5. Save the Template.
Step 6. Again, Head out to Design > Page Element > Add a Gadget > HTML JavaScript. Add the following code into the box:
<div id="featured">
<ul class="ui-tabs-nav">
<li class="ui-tabs-nav-item ui-tabs-selected">
<a href="#fragment-1">
<img alt="" src="http://3.bp.blogspot.com/_b0xJ7qk6DTc/TH_IuKUZnYI/
AAAAAAAAA9M/VAeu2yhU8JY/s1600/image3.jpg" />
<span>15+ Excellent High Speed</span></a></li>
<li class="ui-tabs-nav-item">
<a href="#fragment-2">
<img alt="" src="http://2.bp.blogspot.com/_b0xJ7qk6DTc/TH_HWDk0CJI
/AAAAAAAAA8s/SpiYm3ZE69A/s1600/image2.jpg" />
<span>20 Beautiful Long Exposure</span></a></li>
<li class="ui-tabs-nav-item">
<a href="#fragment-3"><img alt="" src="http://3.bp.blogspot.com/_b0xJ7qk6DTc/TH_IuKUZnYI/
AAAAAAAAA9M/VAeu2yhU8JY/s1600/image3.jpg" /><span>35 Amazing Logo Designs</span></a></li>
<li id="nav-fragment-4" class="ui-tabs-nav-item">
<a href="#fragment-4">
<img alt="" src="http://1.bp.blogspot.com/_b0xJ7qk6DTc/TH_FaAkb6ZI/
AAAAAAAAA8k/d9Qpzcs8sG4/s1600/image4.jpg" />
<span>Create a Vintage</span></a></li>
</ul>
<!-- First Content -->
<div id="fragment-1" style="" class="ui-tabs-panel">
<img alt="" src="http://3.bp.blogspot.com/_b0xJ7qk6DTc/TH_IuKUZnYI/
AAAAAAAAA9M/VAeu2yhU8JY/s1600/image3.jpg" />
<div class="info">
<h2><a href="#fragment-1">15+ Excellent High Speed</a></h2>
<p>Lorem ipsum dolor sit amet, consectetur adipiscing elit. Nulla tincidunt condimentum lacus. Pellentesque ut diam....<a href="#">Read more</a></p>
</div>
</div>
<!-- Second Content -->
<div id="fragment-2" style="" class="ui-tabs-panel">
<img alt="" src="http://2.bp.blogspot.com/_b0xJ7qk6DTc/TH_HWDk0CJI/
AAAAAAAAA8s/SpiYm3ZE69A/s1600/image2.jpg" />
<div class="info">
<h2><a href="#fragment-2">20 Beautiful Long Exposure</a></h2>
<p>Vestibulum leo quam, accumsan nec porttitor a, euismod ac tortor. Sed ipsum lorem, sagittis non egestas id, suscipit....<a href="#">Read more</a></p>
</div>
</div>
<!-- Third Content -->
<div id="fragment-3" style="" class="ui-tabs-panel">
<img alt="" src="http://3.bp.blogspot.com/_b0xJ7qk6DTc/TH_IuKUZnYI/
AAAAAAAAA9M/VAeu2yhU8JY/s1600/image3.jpg" />
<div class="info">
<h2><a href="#fragment-3">35 Amazing Logo Designs</a></h2>
<p>liquam erat volutpat. Proin id volutpat nisi. Nulla facilisi. Curabitur facilisis sollicitudin ornare....<a href="#">Read more</a></p>
</div>
</div>
<!-- Fourth Content -->
<div id="fragment-4" style="" class="ui-tabs-panel ui-tabs-hide">
<img alt="" src="http://1.bp.blogspot.com/_b0xJ7qk6DTc/TH_FaAkb6ZI/
AAAAAAAAA8k/d9Qpzcs8sG4/s1600/image4.jpg" />
<div class="info">
<h2><a href="#fragment-4">Create a Vintage</a></h2>
<p>Quisque sed orci ut lacus viverra interdum ornare sed est. Donec porta, erat eu pretium luctus, leo augue sodales....<a href="#">Read more</a></p>
</div></div></div>
These codes are little bit confusing. So, you have to edit these codes carefully. Here is the customizations:
Replace fragment-1, fragment-2, fragment-3 and fragment-4 with your post URL. There is two link in the code but you have to place same URL. For example: There is two fragment-1. So, replace these two fragment-1 with same post URL.
Red color code is for image URL. Do same as you have done for the Links above. There is two image URL. So replace Image URL with your own. For example, replace both Image URL of Link-1 with your own. Note: the both Image URL must be same.
The text with Pink color is the title of each post. So, replace all of the Pink color text with the title of your post.
The text with Green color is the summary of the post. Replace these text with short summary which must match with the titles.
Step 7. Now, Save the widget and finally you're done!
Make sure you have placed the featured post widget on the top of the "Blog Posts" as shown below:

I hope the customization is not so hard. If there is any confusing then you are free to ask question via Comment. Also, you can share you opinion and suggestion.
UPDATE: Try using this hack so the widget will appear only on homepage and it won't overlap the posts: Hiding Featured Post Widget in Post Pages in Blogger
Do you like this featured post widget? Let us see your work!

Post a Comment