Creating a shatter effect can be done in different ways in Photoshop. Here I will do it without taking the help of any filter, texture etc, but only with what is found in Photoshop. You will need only an image and some patience.
Step 1 : I have opened this free stock image in Photoshop. It is titled Shahi 51 by Berlin Elliot. It can be downloaded here.
Step 2 : In the Layers palette press ALT and double click the Background Layer to unlock it. It will change to Layer 0.
Step 3 : Zoom into the image. I am only interested in the face.
Step 4 : Click the Elliptical Marquee Tool.
Step 5 : Press SHIFT and you will be able to draw out a perfect circle with the Elliptical Marquee.
Step 6 : In the Layers palette click the Add Layer Mask button. A Layer Mask forms immediately next to the Layer thumbnail on Layer 0.
This is how the image looks.
Step 7 : Click on the Layer Mask directly and drag it to the Trash Can at the bottom of the Layers palette.
Step 8 : As soon as you drag it to the Trash Can, this dialogue box pops up. Click Apply.
Step 9 : This is how Layer 0 looks after deleting the Layer Mask.
Step 10 : Press CTRL+A (Select ALL). A column of
'marching ants' surrounds the border of the image.
Step 11 : Click the Move Tool.
Step 12 : In the top panel you will find these six icons appear. Click the 2nd and 5th.
Step 13: You will find the circular selection has moved to the exact centre. Press CTRL+D to deselect.
Step 14 : Click the Lasso Tool.
Step 15 : Draw a small selection with the Lasso Tool. Place your cursor in the middle of the selection. A small scissor will appear below the cursor.
Step 16 : Press CTRL and drag with the cursor. The portion will separate. Drag to somewhere above the image. Click the left mouse button once. The marching ants around the selection will disappear.
Step 17 : Draw another selection with the Lasso Tool, press CTRL and drag it away from the face. This is the tedious part. You will have to do this over and over again.
I have snipped off quite a few fragments from the face. Make sure the fragments are both large and small.
I have fragmented the faced.
Step 18 : Press CTRL+J. Layer 0 duplicates into Layer 0 copy.
Step 19 : Click back on Layer 0.
Step 20 : Press CTRL+SHIFT+U. This desaturated Layer 0. You cannot see any change in the image itself as Layer 0 is covered by Layer 0 copy.
Step 21 : Press CTRL+T. Right click in the middle and from the dialogue box click on Warp.
Step 22 : The Grid Lines of the Warp become visible.
Step 23 : In the top panel click in Warp and from the menu select Flag.
This is how the image looks. Press Enter to apply the transformation.
Step 24 : With Layer 0 highlighted i.e. selected, press CTL and click the New Layer button. A new Layer 1 forms below Layer 0.
Step 25 : Open any suitable image and drag it onto the fragmented face.
Step 26 : The image becomes Layer 2 and sits above Layer1.
Step 27 : Drag Layer1 over Layer2.
Step 28 : Click the Gradient Tool. click on the top panel to reveal the Gradient Editor.
Step 29 : In the Gradient Editor click the first Preset in the top row. Click OK.
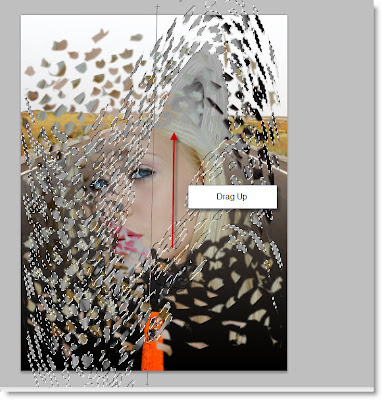
Step 30 : With the SHIFT pressed drag straight up from bottom to top.
Step 31 : Change the Blend Mode to Overlay.
This is how the image look.
Step 32 : Click the Eyedropper Tool.
Step 33 : I am clicking once on the cheek.
Step 34 : The foreground Color changes to the color picked.
Step 35 : Ctrl+click the layer thumbnail of Layer 0.
Step 36 : A selection of marching ants appear.
Step 37 : Click the Gradient Tool.

Step 38 : Press SHIFT and drag from bottom to top with the Gradient Tool.
Step 39 : Press CTRL+D to deselect. This is the completed Shattered Face effect.
Other Photoshop tutorials are here.


Post a Comment