
I am calling this a curtain effect, for that is what the finished image will try to achieve. It can be done in any version of Photoshop.

I will be using this free stock image. You will find it here
It belongs to *Eirian-stock

Step 1 : After opening the image in Photoshop, click the New Layer icon. A new Layer1 forms

Step 2 Click the Rectangular Marquee Tool.
 Step 3 : Draw a selection with the Marquee in the middle of the image.
 Step 4 : Click the Gradient Tool or press g on the keyboard. Click at the top to bring up the Gradient Editor.
 Step 5 : Click on the Foreground to Transparent Preset.
Click OK in the Gradient Editor.
 Step 6: Change the Foreground Color to White by pressing x on the keyboard.
 Step 7 : Drag slightly with the Gradient Tool as shown.
 Step 8 : This is how the image looks with the Gradient applied.
 Step 9 : Drag with the Gradient Tool inwards slightly.
 The image looks like this.
 Step 10 : Click the Magic Wand Tool.
 Step 11 : Click on the left of the image. A selection immediately appears at the left.
 Step 12 : Press x on the keyboard to change the Foreground Color to Black.
 Step 13 Press g for the Gradient Tool. Drag slightly to the right.
 This is how the image looks.
 Step 14 : Click the Magic Wand again.
 Step 15 : Click on the right side of the image. The right side is selected.
 Step 16 : Press g for the Gradient. Drag slightly to the right with the Gradient Tool.
 Step 17 : Press CTRL+D to deselect. The image looks like this.
 Step 18 : Drag the Opacity of the layer down to around 40%.
 Step 19 : The image looks like this.
 Step 20 : Press CTRL+J. Layer 1 duplicates into Layer 1 copy.
 The image looks like this.
 Step 21 : Change the Blend Mode of the Layer to Soft Light.
 The image looks like this.
 Step 22 : Press SHIFT and click on Layer1.Both the Layers are highlighted.
 Step 23 : Press CTRL+E. Bother the Layers are compressed into Layer copy.
 Step 24 : Press CTRL+J. Layer1 copy duplicates into Layer 1 copy 2.
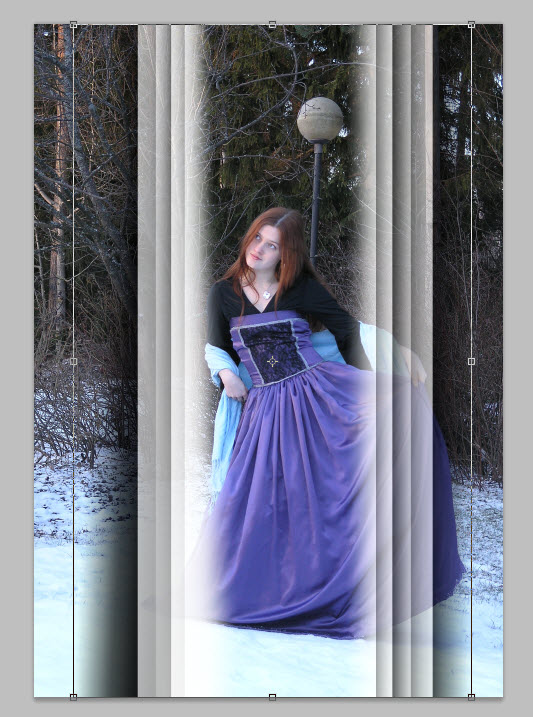
 Step 25 : Press CTRL+T. A selection forms.
 Step 26 : Press SHIFT+ALT. Drag the middle corner handle outwards till you get an effect like this. Press ENTER.
 Step 27 : Press SHIFT and click on Layer 1 copy. Both layers are highlighted.
 Step 28 : Press CTRL+E. Both the layers combine into Layer 1 copy 2.
 Step 29 : Press CTRL+J. Layer 1 copy 2 duplicates into Layer 1 copy 3.
 Step 30 : Press CTRL+T. A selection form.
 Step 31 : Press SHIFT+ALT. Drag the middle handle on either the left or right and drag outwards till you get an effect like this. Press ENTER.
 Step 32 : Press SHIFT and click on Layer 1 copy2. Both Layers are highlighted.
 Step 33 : Press CTRL+E. Both layers are compressed into Layer 1 copy 3.
 Step 34 : Press CTRL+J. Layer 1 copy duplicates into Layer 1 copy4.
Step 35 : Press CTRL+T. A selection forms.
 Step 36 : Drag out the middle handle. You get an effect like this. Press ENTER.
 Step 37 : Press SHIFT. Click on Layer 1 copy3.
 Step 38 : Press CTRL+E. Both layers compress into Layer1 copy 4.
 Step 39 : Press CTRL+J. Layer 1 copy 4 duplicates into Layer 1 copy 5.
 Step 40 : Press CTRL+T. A selection forms.
 Step 41 : Drag the middle corner handle outwards. Press Enter.
 Step 42 : Press SHIFT and click on Layer 1 copy4. Both layers are highlighted.
 Step 43 : Press CTRL+E. Both layers compress into Layer 1 copy5.
 Step 44 : Change the Blend Mode to Dissolve.
 Step 45 : Decrease the Opacity of the Layer to around 50%.
 And here is the curtain effect.
 Step 46 : Click the New layer icon. A new Layer 1 forms.
 Step 47 : With Layer 1 highlighted CTRL+Click on the layer thumbnail on Layer 1 copy 5.
 A selection of marching ants is visible as soon as you click.
 Step 48 : Bring up the Gradient Editor as in Step 5. Click on the Blue, Red, Yellow preset. (You can use any Gradient you please). Click OK in the Gradient Editor.
 Step 49 : Drag down diagonally from left top to right bottom. (You can of course drag in any direction. You will get a different effect).
 Step 50 : Press CTRL+D to deselect. The marching ants go away. The image looks like this.
 Step 51 : Change the Blend Mode to Soft Light or Overlay.
 The image looks like this after changing the Blend mode.
 Step 52 : I have lowered the Opacity of the layer to 60%.
 Step 53 : I am now decreasing the Fill to 85 per cent.
 The image looks like this.
 Step 54 : Right click Layer 1. From the pop up click on Merge Visible.
 All the layers merge into the Background Layer.
 The finished image.
Other Photoshop tutorials are here
Click OK in the Gradient Editor.


Step 35 : Press CTRL+T. A selection forms.


Other Photoshop tutorials are here
Post a Comment