This is a tutorial on Luminosity Masks. Luminosity Masks allows you to increase or decrease lights subtly in portions of the image, without affecting the rest. The image that I will use for this tutorial is unimportant. You can use it, but I would suggest that you try the technique with as many images as possible. It may seem laborious at first, but not when you get used to it.
Step 1 : I have opened this image in Photoshop. It is a free stock image and can be found here
It belongs to Willingmodel
Step 2 : There is only the Background Layer in the Layers palette.
Step 3 : Click the Channels palette. You will find there is the RGB channel on top, followed by the Red, Green and Blue channels.
Step 4 : CTRL+CLICK the thumbnail of the RGB channel.
Step 5 : Photoshop makes a selection of the lightest pixels in the image.
Step 6 : Click the Save Selection as Channel button.
Step 7 : An Alpha 1 channel forms.
Step 8 : Double click where shown on the Alpha 1 channel.
Step 9 : Type in Lights1.
Step 10 : Press ENTER. The Alpha 1 channel is renamed Lights1.
Step 11 : Press CTRL+SHIFT+ALT and click on Lights1.
The selection picks other light areas.
Step 12 : Click the Save selection as channel button. A new Alpha 1 channel forms.
Step 13 : Rename the Alpha1 channel as Lights2.
Step 14 : Press CTRL+SHIFT+ALT and click on Lights2.
Photoshop selects some more light pixels left out by the earlier selection.
Step 15 : Click the Save channel as selection button. A new Alpha 1 channel forms.
Step 16 : Rename it as Lights3.
Step 17 : Press CTRL+D to deselect.
Step 18 : CTRL+CLICK on Lights 1 channel.
Step 19 : The Selection reappears.
Step 20 : Press CTRL+SHIFT+I to inverse the selection.
Step 21 : Press the Save selection as channel button. A new Alpha 1 channel forms.
Step 22 : Rename the Alpha1 channel as Darks1.
Step 23 : The image looks like this. Note that the selection is still in place.
Step 24 : Press CTRL+SHIFT+ALT and click on Darks1.
Step 25 : Photoshop makes a selection of more areas.
Step 26 : Click on the Save selection as channel. A new Alpha1 channel forms.
Step 27 : Rename Alpha1 channel as Darks2.
Step 28 : Press CTRL+SHIFT+ALT and click on Darks2
Step 29 : Photoshop selects some more dark areas.
Step 30 : Click on Save selection as channel button. A new Alpha 1 channel forms.
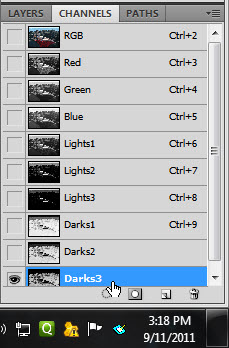
Step 31 : Rename Alpha1 channel as Darks3. Press CTRL+D to deselect. There are now Lights1, 2 and 3 and Darks 1,2 and 3 channels.
Step 32 : Click on Lights1 channel.
The image looks like this.
Click Lights2 and the image looks like this.
Click Lights 3 and the image looks like this.
Click Darks1 and the image looks like this.
Click Dark2 and the image looks like this.
Click on Darks 3 and the image looks like this.
What I have done is scroll through the 3 Lights channels and 3 Dark channels I have created to see the different areas selected in each channel. The next steps are not necessarily to be followed in the order I do. It will depend on your image and how many images you apply this method to. The more images you try this on, the better you will be able to understand.


Step 33 : I have CTRL+CLICKED on Darks3 channel. Let us see the selection.
This channel has selected the rocks primarily as you can see.
This channel has selected the rocks primarily as you can see.
Step 34: Return to the Layers palette with the selection still in place.
Step 35 : Click the Adjustment Layer button. Click on Curves from the pop up.
Step 36 : A Curves 1 Layer forms.
You might feel a trifle baffled when you find your image tinged with red.
Click the Curves 1 Mask.
Step 37 : The image returns to its own colors.
Step 38 : Click the Mask again and see if a tiny border is visible as shown. This indicates that the Mask is selected.
Step 39 : I wish to make the rocks more visible. I have pulled up the top of the diagonal and the highlights in the middle to brighten the rocks, including the one in the foreground. I have dragged down the shadows at the bottoms just a trifle.
The image looks like this. The rocks, including the one in the foreground have more light now without affecting the rest of the image.
Step 40 : Rename the Curves 1 Layer as Darks3, otherwise you will find it difficult to remember which channel you worked on.
Step 41 : I have now CTRL+CLICKED on Lights3 channel.
I find that the sky in the background and the highlights has been selected by photoshop.
Step 42 : With the selection still in place, click back on the Layer palette. Click on the Adjustment Layer button. Click on Curves from the pop up just as earlier.
Step 43 : Photoshop names this Adjustment Layer as Curves 1 as we had changed the original Curves 1 layer to Darks3. Click on the Layer Mask.
Step 44 : I have dragged the midpoint of diagonal down in the Curves to darken the sky and the waters.
The image looks like this. The sky and the waters have been darkened without affecting the rest of the image.
Step 45 : Rename the Layer Lights3.
Step 46 : CTRL+CLICK on Darks2 channel in the Channels palette.
Step 47 : Photoshop selects the face and portions of the body and a bit of the rocks.
Step 48 : Click back on the Layer palette. Click the Adjustment Layer button. Click on Curves.
Step 49 : Another Curves1 layer forms. Click the Mask.
Step 50 : Rename it Darks2 so that there is no confusion.
Step 51 : Pull up the highlights in the Curves.
The girl's face and body get increased light. The effects are subtle.
Step 52 : Drag the shadows down just a trifle.
The rocks in the foreground darken slightly, but details can be made out.
Step 53 : I have increased the lights just a tad by dragging up the diagonal slightly.
The image looks like this.
Step 54 : CTRL+CLICK on Lights2 channel.
Step 55 : Click back on the Layers palette.
Step 56 : Click on the Adjustment Layer button. Click on Curves.
Step 57 : Photoshop forms another Curves1 Layer. Rename it Lights2 and click on the Mask.
Step 58 : In the Curves click the midpoint of the diagonal which is the highlights. Drag the top of the diagonal to and drag down at the bottom.
The finished image. Note You can make a number of Lights and Darks channels depending on your image. Also it is not necessary that you will have to tweak each and every channel, but you can try your hand at it, just to understand the process. Go over the steps with as many images as possible and you will be able to master this process. That's all.
Other photoshop tutorials are here


Post a Comment